
Five Tips For Designing Your CD Packaging
By Estimated reading time: 8 minutesAs an experienced musician, you know your instrument like the back of your hand. You’ve spent thousands of hours with it, memorizing every last detail, exploring every feature, and learning every sound it can possibly produce. You know how to care for it, how to tune it, and how to make it produce the right sounds at the right times.
That knowledge produces some pretty incredible results, and after hundreds or thousands of hours, you’re almost ready to order your new album. All that’s left is creating your album artwork… while that’s something you haven’t spent hours mastering, there are steps you can take and tips you can learn to make the process easier.
If you’re thinking about designing the album artwork yourself, here are some quick tips you should know about setting up your design files.
Bleed is Important…
When you print one copy of something, it’s easy to take time to ensure that it is trimmed precisely. When you have hundreds (or thousands) of the same something to cut, the task of cutting out individual sheets, with precision, becomes daunting.
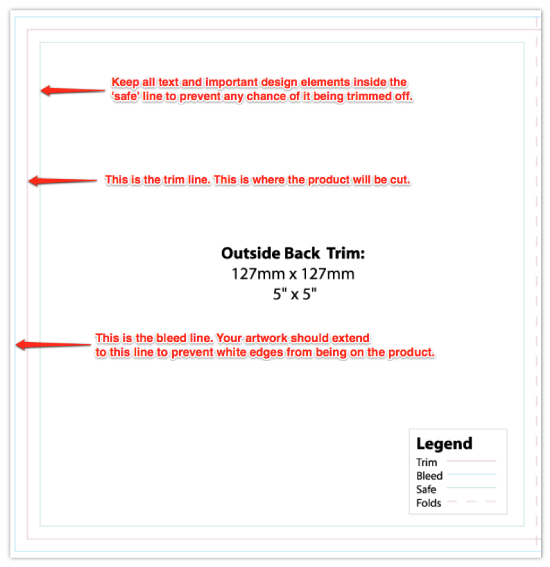
Commercial printers do have equipment that speeds up the process—either by using pre-programmed measurements to cut each piece, or by cutting large quantities all at once—but even the best pieces of equipment aren’t 100% accurate all of the time (due to the limits of technology and paper stretch). The discrepancy is usually small, but, without bleed, even being half a millimeter off on cutting produces a noticeable white line down the edge of the paper. That’s not what you want for your jewel case insert or digipak. The solution? Extend the artwork slightly beyond the desired cut line—i.e., add bleed. This gives the print shop a margin of error when trimming. That way, if they happen to be slightly off when cutting, the continued artwork shows up instead of the white paper.
In the printing industry, .125” is a commonly requested bleed setting; this means the artwork extends .125” from the cut line on each side. This will be cut off, so do not include anything like text or titles in this area; please see the next comment about safety margins for more details.
… As Are Safety Margins
While bleed extends artwork out from the cut line to provide a margin of error, safety margins move inward from the cut line for the same purpose. If critical elements—such as your song titles, lyrics, album credits, or a portion of a photograph—are lined up right on the cut line, they run the risk of being trimmed off. To prevent this, it’s a good idea to leave a gap or cushion between essential design elements and the desired cut line.
The size of the margin changes from one print shop to another, but .125” from the edge is a great place to start.
Colors Are Not Created Equally
If you’re not immersed in the design or printing worlds, you might not have heard of CMYK or RGB, let alone know the differences. But if you’re designing your album’s artwork, it’s an important distinction to know.
RGB colors—where each shade is created by combining red, green, and blue pixels—are used by thousands of electronic devises: televisions, phone screens, computer monitors, and cameras. Higher quantities of the contributing colors result in lighter tones, and lower quantities create darker tones. RGB colors can appear to be very vibrant, but this is in part because they are lit on a screen. It’s also important to note that different displays and devices can have different RGB profiles.
On the other hand, CMYK colors are the standard format for the printing industry. With CMYK printing, the Cyan, Magenta, Yellow, and Black inks are combined to create colors. Because physical surfaces like paper don’t generate light like screens, less ink means lighter colors (less ink covering the white paper), and more ink mean richer or darker colors.
These two different color profiles can create issues when designing your album artwork. Not every RGB color has a CMYK counterpart, and vice versa. The two profiles also represent very different technologies—a back-lit computer screen vs. ink on paper. This means two things:
- Files designed in RGB can look very different when converted to CMYK for printing. Some CD manufacturers offer digital proofs of your order. If your proof file looks different from the file you submitted (for example, the colors are off, or the blacks look gray), it’s probably because your submitted file was created with RGB and it has been converted to CMYK for printing.
- The color you see on your computer screen will not match the printed material. Even if the file on the screen is CMYK, it’s still back-lit. There will always be some discrepancy in appearance between the screen image and the printed product.
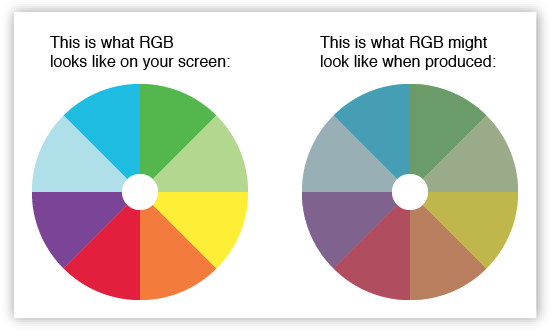
To reduce the chance of a drastic color shift, it’s best to design and export your file using CMYK settings.
Understanding Resolution
Resolution is described in terms of pixels per inch (ppi) or dots per inch (dpi). When fewer dots are needed to fill a space, the resolution is lower/worse. This is because the dots have to be larger, making them more distinguishable.
Think about a fence. If the boards are eight inches wide and seven feet tall, you’ll be able to pick them out fairly easily from twenty feet away, and it won’t take many boards to span a section of fencing. However, if the fence is made from tiny wooden sticks—the size of toothpicks—all lined up perfectly, identifying individual sticks from twenty feet away becomes difficult, and it’ll take a lot more sticks to cover the same section.
It’s important to design your album artwork at a high resolution and at the proper dimensions. For example, if the image will be used at 4″ x 5″ in the printed material, then it needs to be that size and high resolution in its original form. Trying to increase the resolution of a low-resolution image (say, resampling from 72 dpi to 300 dpi) causes a loss of quality, since it just samples nearby pixels to meet the desired resolution settings. Likewise, taking an image that is high-resolution and scaling its dimensions up (from a 1” square to a 5” square, for example) results in a lower resolution, since each pixel is stretched to meet the file’s new dimensions. Taking a large image and scaling it down in dimension can result in a higher resolution image if you don’t change the number of pixels.

For printing, 300 dpi is the industry standard for photographic images; higher resolutions are acceptable for other types of artwork.
The Right File Type
Saving your album artwork file in the right format is important, but the right format will vary from one CD manufacturer to the next. Submitting the right file type can prevent errors and delays on your order.
Some print shops will accept design files (IDML, INDD, or PSD files, for example); however, since these file types are not usually readable by the printers themselves, they’ll need to be opened and exported into readable file types. This creates a chance for error, especially if links and fonts aren’t submitted with the design file.
To avoid potential errors and the extra step of exporting files, other print shops will only accept already-exported files. These include PDF, TIFF, JPEG, and EPS file types. Some will even request that you use specific export presets.
To know for sure which file type is right, check with your print shop or CD manufacturer.
Bonus Tip
When you’re ordering your CD and CD packaging, the CD manufacturer wants your order to be as right as possible. It’s true. They don’t want to bug you about missing files or fonts, text that’s cut off, or low-resolution pictures, and they don’t want to ship you finished product that has all of these issues or more. They do want to manufacture your order in a timely, efficient manner and ship you quality product with beautiful artwork—something they and you can be proud of.
To help achieve this goal, many manufacturers have a design team ready to create artwork for the musicians who can’t do it themselves.
For musicians who want to tackle this step on their own, the CD manufacturer might also offer templates for a variety of design programs. These templates are set up to include the correct bleed settings, guide marks, and dimensions. Be sure to use the right template for your project—there is a difference between a 4-panel digipak and a 4-panel jewel case. You’ll also need to open them in the right color profile and resolution settings and save or export them correctly. Using the provided templates will greatly reduce the odds of production issues on your order.
And that’s it! Five tips, plus one, to help you create your own album artwork. Now, get back to that instrument you love!
7 Comments
...Keep Reading


